


Introduction
In this blog post, we are gonna learn to make a simple Phone book web application that will store the name, contact number, and email address of as many people as we want. We will be using google firestore for storing the data. So this blog will also serve as a comprehensive tutorial for Google firestore as well.
Before diving into building the application, let's talk about Google Firebase and the features that it offers. Firebase is a toolset to “build, improve, and grow your web/app”, and the tools it gives you cover a large portion of the services that developers would normally have to build themselves, but don’t really want to build, because they’d rather be focusing on the web/app experience itself. This includes things like analytics, authentication, databases, configuration, file storage, push messaging, and the list goes on. The services are hosted in the cloud and scale with little to no effort on the part of the developer. Because of the way Firebase products work, some people might call Firebase a “backend as a service” (BaaS)
Having gotten to know what Firebase is, we shall now concentrate on building our application😉. We are going to use the Firestore feature provided by firebase to build this application. So without further ado, let's dive into setting up our firebase!!
Setting up your firebase account
Open your browser and proceed to Google Firebase. Assuming that every one of you would be having a google account already logged in your browser, click on "Go to console". Doing so will take you to a page where you can view your already existing projects on firebase(if you have any) and will also provide an option to create a new project.

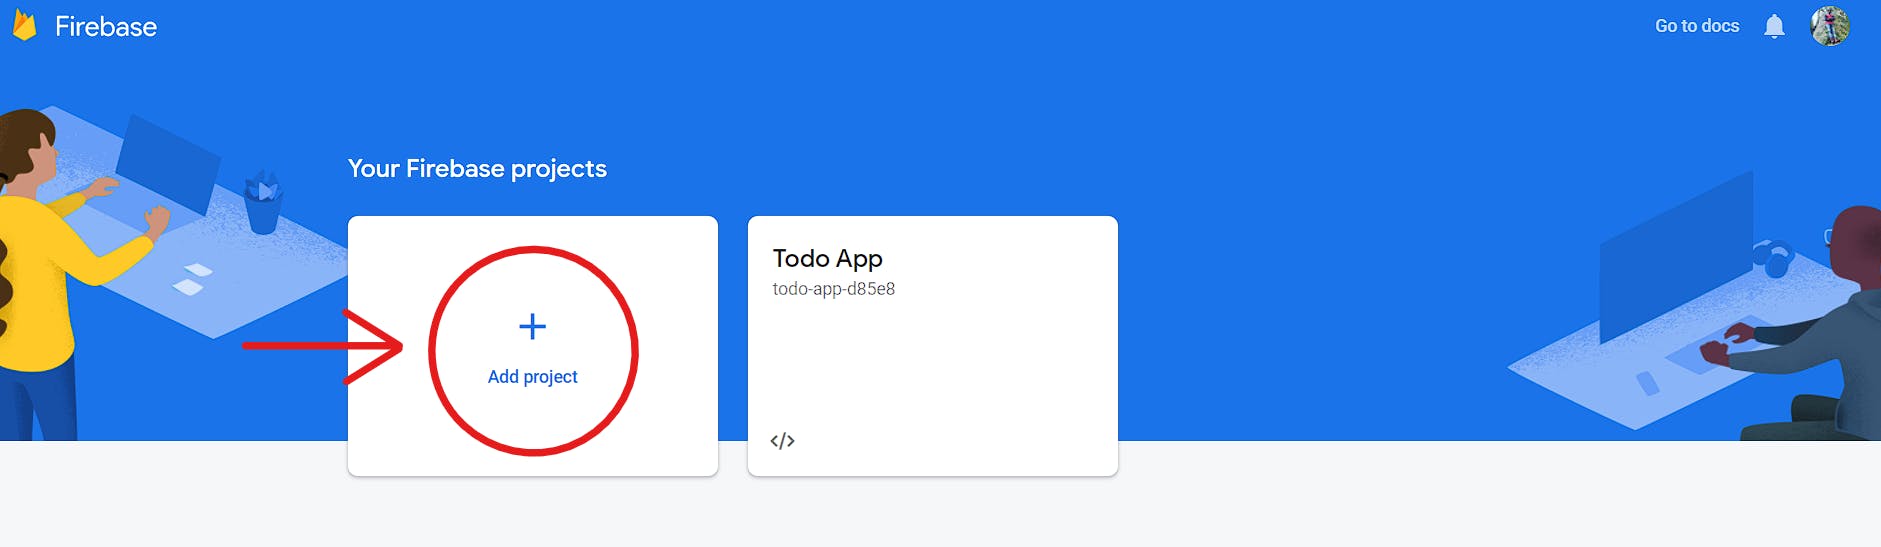 After clicking on Add project, give your project a name( I am gonna use 'Phone Book') and proceed to the next step. In the next step, if you wish to enable google analytics, you can enable it. But for the sake of simplicity, let's not enable it as of now.
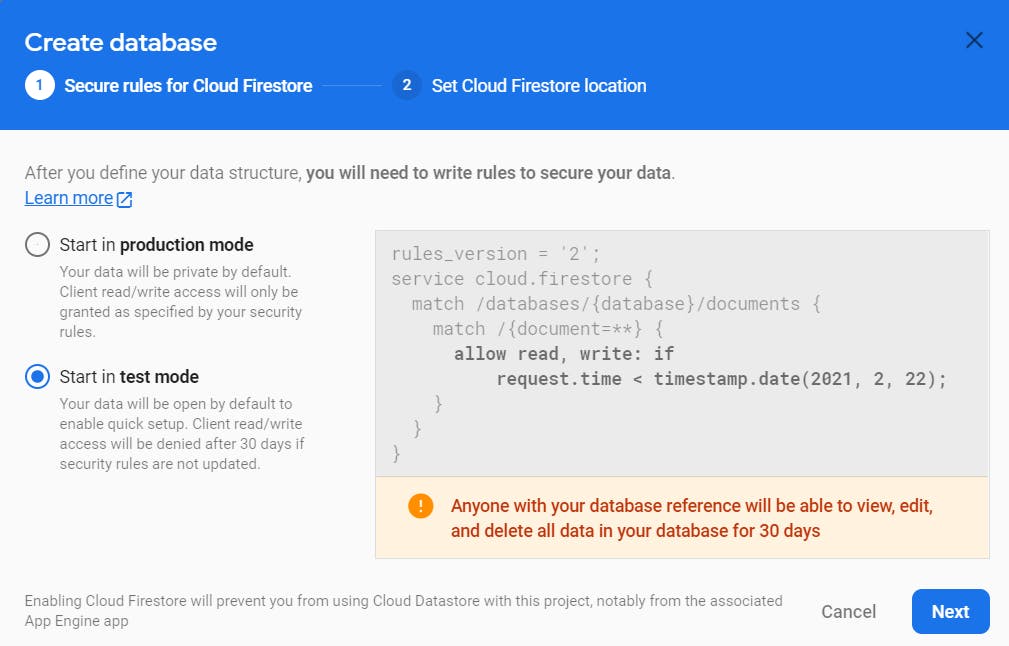
After creating a new project, click on Cloud Firestore on the right-hand side nav bar and click on create database. Make sure that you start your database in test mode. Completing the steps until now would have created a new database for your project. I have named the database for this project as Phone Book.

Creating a Collection and storing data
After creating a database, we can start storing data on firestore! The first step is to create a collection. Documents live in collections, which are simply containers for documents. For example, you could have a contacts collection to contain your various contacts, each contact represented by a document. So basically a collection is like an array of documents and a document is like a single object which has key-value pairs to store the actual data. Each individual document corresponds to one entry of data and a collection is a container of these documents. The documents themselves are similar to that of javascript objects, wherein they store data in key-value pairs. Moreover, each document in a collection is represented with an auto-generated unique id.
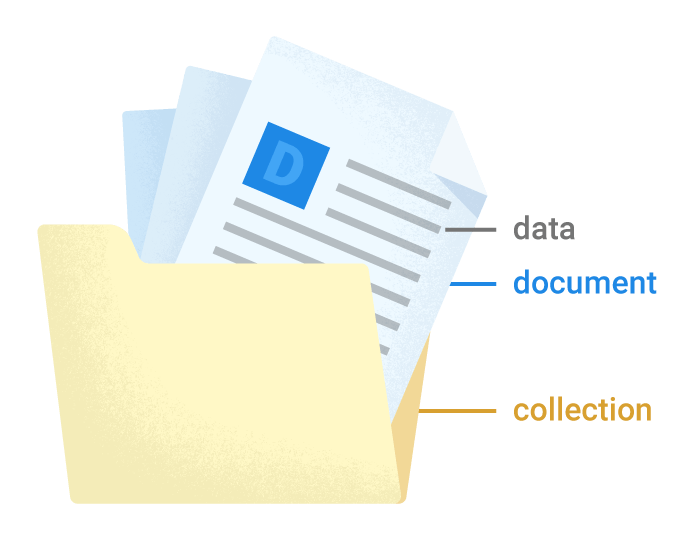 (Illustration explaining about collections and documents)
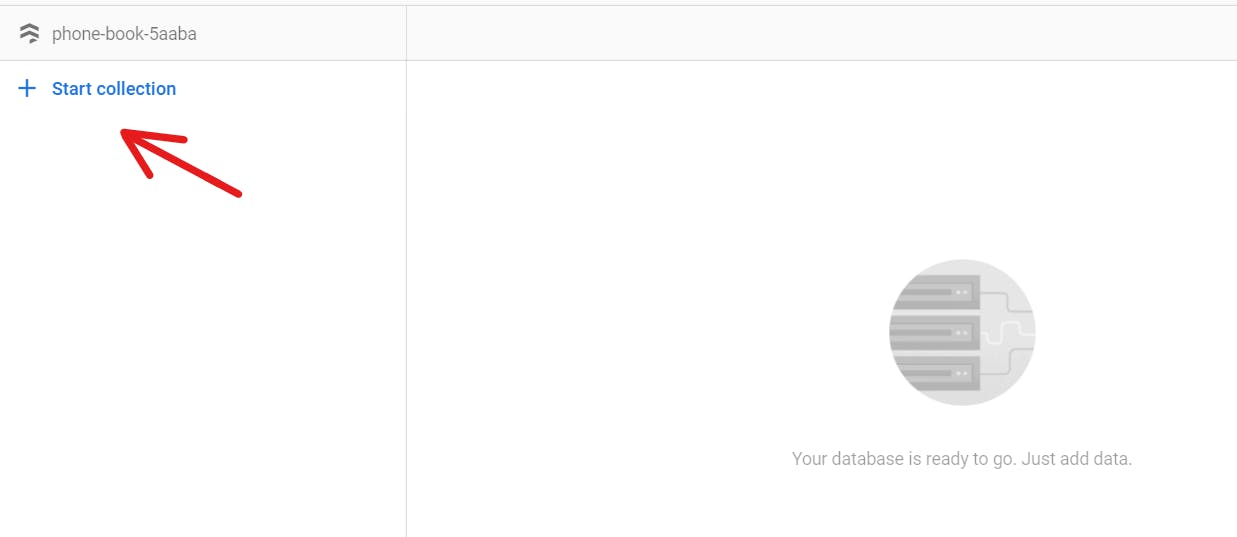 (Create a Collection and give it a name)
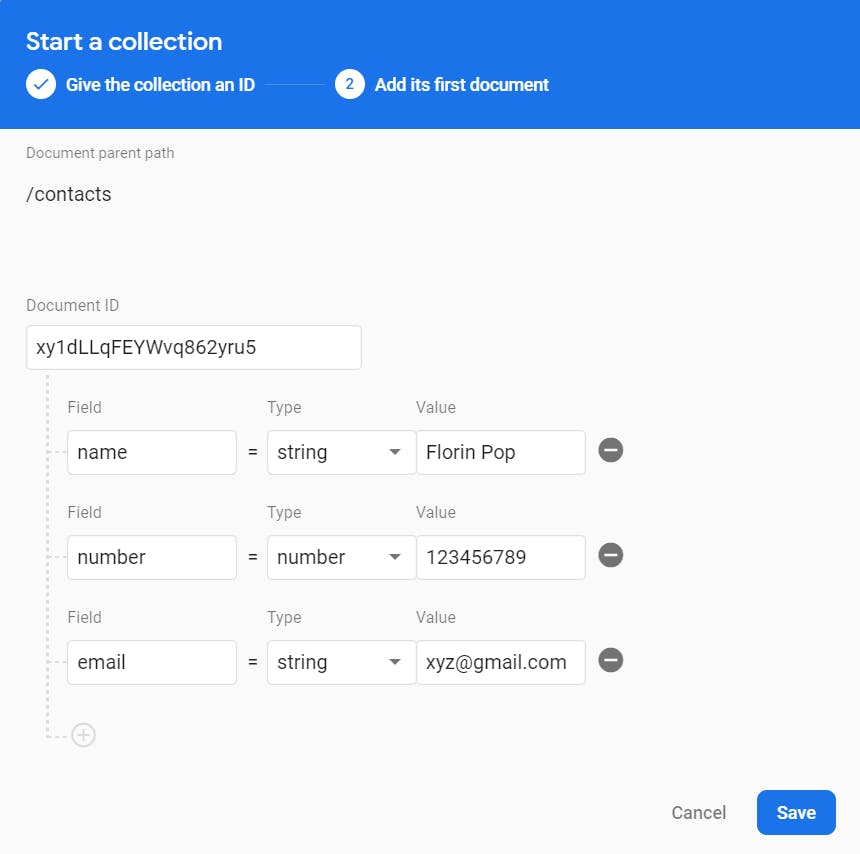 (Add a document to the collection that was created)
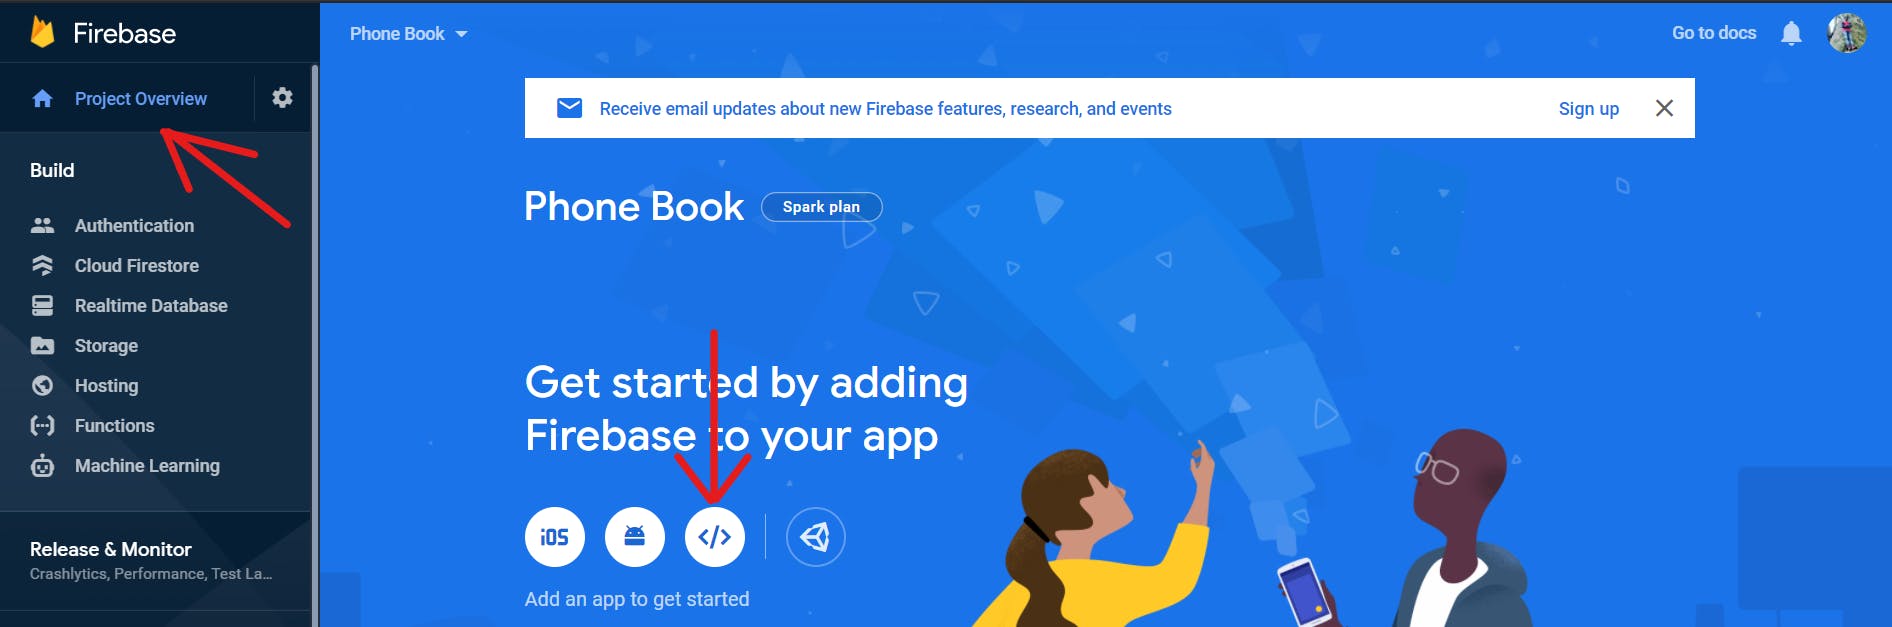
The final step that needs to be done before we start coding is to add the script tags necessary to link the project created on firebase to your web application. These script tags can be obtained by clicking on Project Overview and then clicking on the web application icon as shown in the below pic. Simply give your web app a name and copy-paste the script files onto your project.
Let's start coding our application!
The first step is to create an index.html file and copy-paste the script tags that was there in firebase. Apart from that, we also need to add the following code to the script tag in the index.html file:
const database = firebase.firestore()
<script src="https://www.gstatic.com/firebasejs/8.2.2/firebase-firestore.js"></script>
To get access to Firestore methods, we use firebase.firestore(). This method needs to be executed every time we want to interact with our Firestore database. I would recommend creating a dedicated variable to store a single reference to Firestore. Doing so helps to cut down on the amount of code you write across your app.
Let's also write some HTML boilerplate code which will be used later to add contacts to our Phone Book.
    <div class="container">
      <form id="add-contact">
        <input type="text" name="name" placeholder="Name" />
        <input type="text" name="number" placeholder="Contact No" />
        <input type="text" name="email" placeholder="Email Address" />
        <button>Add Contact</button>
      </form>

      <ul class="contact-list"></ul>
    </div>
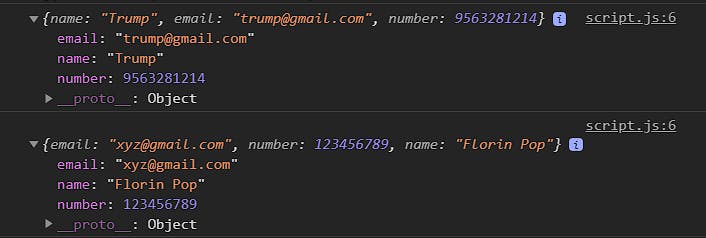
Now that we have our project created, let's access our database. Note that I have already added two contacts manually to our database.
Getting Data once from Firestore:
The code given below is just for explaining how data is stored in Firestore, and thus the code snippet given below need not be added to the application.
database
  .collection('contacts')
  .get()
  .then((data) => {
    data.docs.forEach((doc) => {
      console.log(doc.data())
    })
  })
Breakdown of the above code:
database.collection(' collectionName' ) is used to capture a collection with a particular name
.get() method is used to retrieve all documents inside a collection
.then() method returns a promise, which takes in a callback function as an argument
The code inside the .then() method is used to retrieve the useful data alone from every document and display it in the form of objects
The output of the above code snippet is given below:
Adding data to firebase from browser:
form.addEventListener('submit', (event) => {
  event.preventDefault() //To prevent reloading of page
  database.collection('contacts').add({
    name: form.name.value,
    email: form.email.value,
    number: form.number.value,
  })
  form.name.value = ''
  form.number.value = ''
  form.email.value = ''
})
.add() method adds a new document to the collection. So in the above code, we are obtaining values from the input fields on the browser and adding the data as documents to our collection. Adding the data to our database is done once we click the button( This is implemented through an event listener). The key takeaway from the above code snippet is the use of .add() method
Rendering the data to the browser from firebase
function renderData(doc) {
  let li = document.createElement('li')
  let name = document.createElement('span')
  let number = document.createElement('span')
  let email = document.createElement('span')
  name.textContent = doc.data().name
  number.textContent = doc.data().number
  email.textContent = doc.data().email
  li.appendChild(name)
  li.appendChild(number)
  li.appendChild(email)
  contactList.appendChild(li)
}
We have created a function named renderData(). This function is used to display the data stored in our database onto the browser. The function takes a single document as an argument. So in order to display the entire data stored in our database, we would need to loop through each document in our database and pass the individual documents to the renderData() function we created. Moreover, to display the documents immediately after we add a new document, we would also need to listen for changes in data real time. Everything said till now is going to implemented by a Firestore method called onSnapshot()
Get realtime updates with Firestore:
You can listen to a document with the onSnapshot() method. An initial call using the callback you provide creates a document snapshot immediately with the current contents of the single document. Then, each time the contents change, another call updates the document snapshot.
database.collection('contacts').onSnapshot((snapshot) => {
  let changes = snapshot.docChanges()
  changes.forEach((change) => {
    if (change.type == 'added') {
      renderData(change.doc)
    }
  })
})
The above code is used to call renderData function every time there is a change in our database( In our case it is considered as a change only if we add a new document to our database). That's it guys, the javascript code needed for the application is done!! Add some CSS on your own to make the application look good.
Let's Revise:
Created a new project in our Firebase account
Headed over to Firestore and created a new collection for storing our data
Copy pasted some script code to connect our application with Firebase
Learnt how to access the documents from our databse, add documents to our database and render the documents to the browser
Some important methods to remember:
  1) .data()
  2) .add()
  3) .onSnapshot()
  4) .docChanges()
Hope you guys found the resources listed in this blog post helpful. If you enjoyed this article, share it with your friends and colleagues! Let me know your valuable feedback in the comments section!